By Philip Staiger
If you want to follow this tutorial, all you need is
a copy of trueSpace and a copy of Project Dogwaffle version 1.2, which is
available FREE with no limitations or restrictions in use -
you can
download it here.
 |
Start Project Dogwaffle
You will be prompted to select the size of the buffer. This
is the drawing area, or canvas. Enter the size (in pixels), or
select a preset from the list.
Note that the presets come from a text file which can be edited
in Notepad if you wish to make your own presets -for example, a few
square sizes such as 512x512 or 1024x1024 would be handy if you plan
on making lots of textures. The file is called Def_Res.txt
and can be found in the folder where you installed Project Dogwaffle
(typically C:\Program Files\project dogwaffle )
|
| In this case, we are going to create a canvas
which is 145 x 145 in size, although you can choose any size that
you prefer! |
|
First Texture
We will now create our first texture.
Click the Filter menu, select 'Render', and select the 'Dread
Plating...' submenu - the image on the right shows where you will
find this particular effect.
 |
This opens the dialogue on the left - check
the 'Weathering' box, set the scale at 7, and click 'Go'.
The Status bar will show the time remaining for the effect
to be generated (some effects take longer than others). |
|
 |
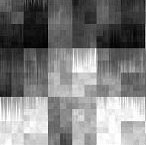
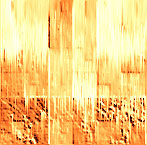
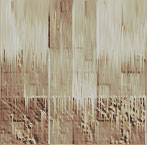
| Here is a detail from
what the created texture will look like (yours of course will be
different, as the result is randomized each time). Note that
in the title bar, Project Dogwaffle shows the zoom factor and
which buffer we're looking at - you can see an example below,
where we are looking at the Main buffer with 100% zoom. As well
as the Main buffer, there is also a Swap buffer, and we will
discuss those later!

|
 |
There are many plug-ins with filter effects
which are included with Dogwaffle. Some do more than one
thing, and this particular plug-in (Dread Plating) had the
weathering FX enabled. This gives a similar result to running
the Dread Plating filter without weathering, and then applying
the Wet paint FX after that - using the check box lets you do
both steps at one time.
|
|
Undo and Redo -
u)ndo and a)gain
This is a good time to explore Undo and Redo. Undo affects
the most recent effect - recall that we said having Weathering
checked ran the Wet Paint filter, and so that is just what
Undo will affect, removing the Wet Paint filter effect.
Try it for yourself - hit 'u' for undo (or Control-Z), and
you will see the weathering FX disappear but the Dread Plating
remains. Hit undo again, and the Dread Plating is gone too
(see sample on right). |
 |
Use Redo to re-apply a step. Dogwaffle uses the shortcut 'a'
(for 'again') - try it now, and we are back with the dread
plating but without the weathering effect.
|
|
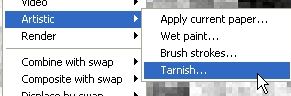
Tarnish
Still in the Filters menu,
select Filters > Artistic > Tarnish
|
 |
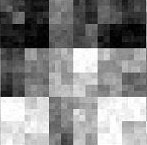
This is a tool for a different type
of weathering effect, more like wear and tear.
Select the maximum value for the slider (as seen on
the left), and then click OK - apply the same effect
two or three times, and this should get the desired
level of tarnish. |
This will look something like the result on the right. |
 |
|
Color Emboss
It's time to add a hint of 3D embossing to this texture.
Select Filter > Convolve >
Color emboss...
This is one of the faster filters, and will show the
embossing in real-time as you move the slider, making it
very easy to try different effects and choose just the right
amount of effect. |
|
 |
You can see the setting that I used on the
left, and the end result is seen on the right. The Color
Emboss effect is similar to having bump mapping added in
trueSpace. Feel free to adjust the Emboss setting to get a
result that meets the ideas you have in mind for your
texture. |
 |
 |
Wet Paint
Back to the Wet Paint effect!
Something like this was originally part of the Dread Plating
filter when we had the Weathering option checked, but we
removed it using the Undo feature. Now we'll play with the
filter directly, using Filter > Artistic > Wet paint... |
| What I have done here is flip the image (using Buffer
> Flip > Vertical) to place the lighter areas on top,
and then used the Wet Paint filter, with a value of 30 on
the slider. Positive values (moving the slider to the right)
make the lighter colors run downward, while negative values
(moving the slider to the left) make the darker colors run.
This was why I flipped the image before running the Wet
Paint filer, to put the lighter colors at the top in order
to give the look that I wanted. |
 |
|
The power of the Gradient
At the moment, what we have is essentially a grayscale
image. To give it more interest and life, we'll apply a
gradient over it, to add some color to it.
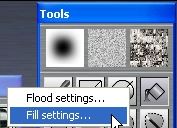
There are several ways to show the gradient tool.
You can hit the shortcut ("p") or right-click on the fill
tool (paint can near upper-right of Tools panel) and select
Fill Settings. |
 |
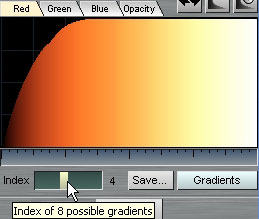 |
There are four tabs in the
gradient which control the 4 channels - Red, Green, Blue and
Opacity. You could paint directly inside the colored area to
change the progression of the current channel from left to
right. Or you can start by exploring the predefined
gradients. There are 8 in the set.
You can also click the 'Gradients' button to choose
another set.
Select gradient #4 from the default gradients set. It
goes from black through red/orange and yellow to white. |
We can now map this gradient, i.e. this progression of
colors, to the pixels in the current buffer, using Filter
> Color > Map to current gradient |

|
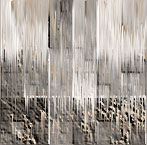
This gives us the result on the right, where our grayscale
values have been mapped to the gradient we selected.The
color here is a little strong though, so we need to take
some corrective action to get the result we were looking
for! Fortunately Project Dogwaffle makes that an easy
process, thanks to a very helpful tool. |
|
|
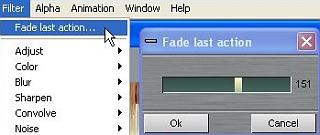
Fade Last Action
One very powerful feature is
'fade last action,' which is also called interactive undo.
It lets you choose a result that is partway between 0% and
100% of the most recent effect you applied.
To use it, just select Filter >
Fade last action |
| Use the slider to change the mix between
'fully applied' and 'not applied'. Using the setting above
we can avoid having such a strong orange look, and reduce
the effect to give us a look that is more suitable for a
stone or wall. Keep this feature in mind when you apply
lens flares or other FX which come too strong and you want
to blend them with the image prior to the effect, to make
them fainter and make them blend in to the image. |
 |
 |
We're going to adjust the image a little
more, to reduce the contrast. We can find that option under
Filter > Adjust > Value |
 |
The options here will let you adjust
Contrast, Gamma and more - in this case all we do is reduce
the Contrast down to 41, which makes the changes in the
image less drastic, and gives the result below:
 |
|
Optipustics, or Fractal
Particles Brushes
This strange sounding word is actually one of the most
powerful features in Project Dogwaffle! They are mini-2D
particle systems that let you create instant grass and other
effects which you can paint onto your image or texture
The shortcut is "i" - does it stand for i)ncredible?
You can learn more about particle brushes
here |
 |
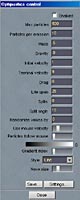 |
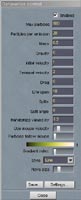
The control panel for optipustics gives you
a wide range of options for modifying the particle system.
It can be quite daunting to see the list (you can click on
the small image to the left to see a full size version of
the panel), but no need to be discouraged! You can get
started using the particle brushes right away without
modifying a single parameter. First, click on the 'Enabled'
check box at the top. This changes the brush that you are
painting with into a Particle Brush (simply uncheck the box
again to return to a normal brush).
Then, on the bottom right, click on the 'Settings'
button. |
This opens a list of presets that you can use. The presets
give you a complete range of particle settings for instant
effects such as painting branches, trees, grass and more.
Be warned, this feature is a lot of fun! You might want to
take the time to save your image before you continue, as you
might want to try all the different presets just for the
enjoyment of it. Of course, you can always use the undo
feature too.
When you are ready, select the Grass.opt as we are going
to paint some grass at the bottom of our texture. When it
says 'Replace existing gradients with colors from file?'
choose Yes (this gives you a set of gradients specifically
designed for making grass.
|
 |
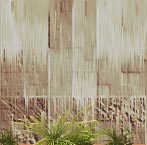
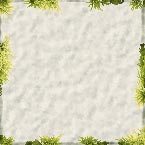
| Now paint along the bottom of the image -
you will find that a very short click is all that is
required to "dab" on a patch of grass. The longer you hold
the mouse button down, the more particles are created, and
the further they travel. Try to keep your clumps of grass
fairly small. If you want, you can adjust the parameters to
modify the style of the grass, or adjust the gradient to
give different colors - here I just used the defaults.
And remember, if you paint on a clump that looks bad,
just use Undo to remove it! |
 |
We can now apply this texture to the wall in our scene:
|
|
Bump Map
We are going to turn our image above into a bump map,
which we will use in trueSpace to add some roughness to the
surface. This will make the wall texture more visually
interesting, and complete our work there.
|
 |
To make the bump map, we'll remove all the
color from the image and leave it as a grayscale image only.
To do this, use Adjust > Hue / Sat / Value |
 |
Then simply move the Saturation
slider all the way to the left, which will remove
all color from the image. This gives the result on
the right, which we can load into trueSpace as a
bump map, given the image on the right below. |
|
 |
|
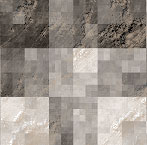
Second Texture
We now want to make a texture for the ground, and we will
make some paving stones.
To give us a base look, we will
start with some noise. We just want grayscale noise rather
than color, and you can find this option at Filter >
Noise > Value noise |
 |
 |
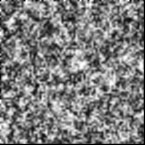
| This gives us a basic grey background which is
the beginning of our paving slab, as you can see on
the right. Remember as we work through this that
there are many other ways to work, and this is just
one example to get you started! |
 |
|
|
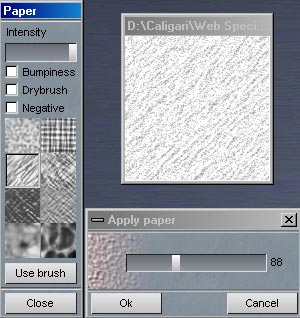
Paper Makes Rock
Let us add a little more detail to the texture, as it is
currently too random. We want to add some type of pattern.
Using Windows > Paper you can open up the Paper
panel, which lets you select from a variety of preset papers
as a background to your image. You can see the one I
selected in the image on the right, though you can choose
any you think works best.
Then use Filter > Artistic > Apply current paper
This opens the blending box and lets you set how much
effect the current paper has on the image - you can copy the
value I used here, or use your own. My intention here is to
get something that looks a little like a concrete slab. |
|
 |
Buffers
Now let us make use of the buffer. Project Dogwaffle v1.2
has two areas for the one image that you see - the Main
Buffer is the one that is visible. Meanwhile, there is a
second area that you can't see - use the Swap Buffer and you
will switch them. Right now, it looks like your image is
cleared, but this is not the case. Our in-progress texture
is still safe, stored in the Swap Buffer, and the empty
contents of the Swap Buffer are moved into the Main Buffer
(you can test this by using Swap buffers again, and
again...) |
 |
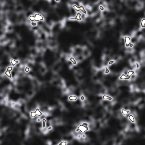
Plasma
Noise
Let us give the texture
the appearance of some roughness. To do this, use
Filter > Render > Plasma noise
In the control panel that pops up, use Iterations
of 2 to get an effect similar to that on the right.
Having done that, use Swap buffer again to bring
back our original texture. |
|
 |
 |
Getting Clever
With Buffers
Buffers do more than let you keep two images in memory at
once - their real purpose is to let you mix those two images
together in a variety of clever ways.
There is too much to cover in
this one tutorial and we will be using only one process, and
that is Filter > Emboss by swap
|
| I used emboss with a light source from the bottom right,
and a fairly low level of emboss. This gave the image on the
right, where our Plasma Noise image has been used to roughen
the appearance of our earlier texture. As ever with
Project Dogwaffle, you have a lot of options here - you
might want to try different images in the two buffers, and
also try different ways to combine them, depending on just
what sort of look you are going for. |
 |
|
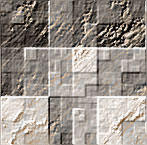
Final Touches
Use Filter > Blur
> Gaussian Blur with quite a mild strength to smooth out
the image to get something similar to the image immediately
on the right.
We are going to add some color
to this texture now, since it is all grayscale so far, so
select Window > Fill / Gradient and click on
the 'Gradients' button to load some gradient presets -
select Reds.grd, and then use the Index slider to select
gradient number 5. |
 |
|
Then use Filter > Color > Map to
current gradient
This effect will be too strong,
giving a very intense or rich color that isn't suitable, so
use Filter > Fade last action with a
value of around 149 to make the colorizing effect very
slight. I then adjusted brightness contrast and saturation
to get the image on the right. |
 |
 |
There is one last thing to add,
and that is grass at the edges of the slab. Open up the
Optipustics panel once more, and make sure you have the
Grass preset loaded. This time though we need to adjust
some of the parameters - lower the Gravity to 0 (as we don't
want the particles to "fall" toward the bottom of the image
in this case but to spread out evenly from the brush, as
this grass is being viewed from overhead), and lowering the
Velocities means that the particles do not travel so far.
Lowering the lifespan makes the particles reach the brighter
color in the gradient quicker.
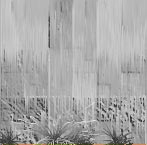
|
Check the Enabled box in the Optipustics panel, and
start painting some grass along the edges of our image. Keep
it fairly sparse, and maybe place more at the corners than
elsewhere.After adding some grass, I used a regular
paintbrush with a low opacity to darken the edges of the
image to show the edge of the paving slab, and ended up with
the image on the right. |
 |
 |
Pot Luck
About the last thing left to do is create a texture for
the pot. We are going to make about the simplest texture of
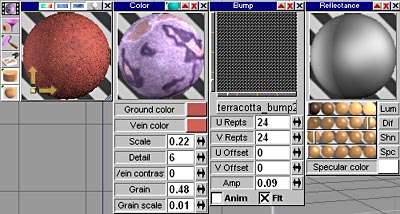
all, just a bump map for a terracotta type texture.
Load the Gun Metal gradients, then choose gradient number
4. Use Filter > Render > Bumpy Toy and choose
Spikey Perlin. You can copy the settings shown on the
left if you like. If you have used trueSpace shaders with
noise in them, then you will be familiar with the workings
of this filter. |
This gives us the result on the right. Notice that I wanted
to have definite "islands" in the noise, sudden bright
specks in the pattern, which is why I have gone for these
settings. Spikey Perlin does not let you adjust some
of the parameters though, and it always gives you the same
result - Recursive Subdivision will give you a unique
result each time you click apply. However I really did want
small bright spots in my end result, so I didn't use that
one this time. |
 |
| I adjusted the brightness and contrast once
again, using Filter > Adjust > Value. Remember, this
is only for a bump map, not for a color texture, so that is
why this doesn't look like terracotta! We can apply it as
a bump map in trueSpace now, with just a simple reddish
brown color made using the Marble color shader for just a
tiny variation between the two colors. |
 |
I used a high repeat for the bump map which should give us a
nice rough surface (and a little faster than using a
procedural Bump shader as none of that complicated math
needs to be worked out every time the scene is rendered!).
You can see the settings I used below:
 |
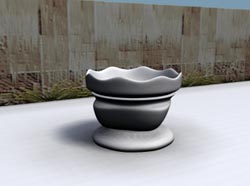
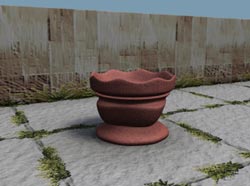
| Now we can have a look at a final render, with the three
textures in place! Although the lighting looked good when
we first created the scene with the default white textures,
it all looks a bit dark and shabby now, more like a grey day
than a sunny day. We could now change the lighting around to
match the darker colors in use in the textures, to brighten
it up, and re-render.
Or we could make quick changes using post-processing! |
 |
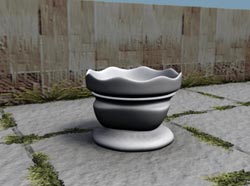
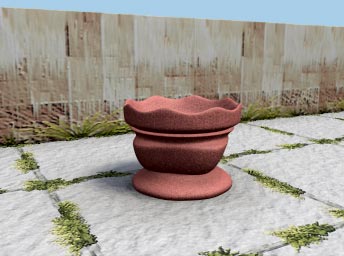
And that is just what I did below with a quick application
of Filter > Adjust > Value to experiment with different
Value, Brightness, Contrast and Gamma settings, followed by
a Filter > Adjust Hue / Sat / Value to increase the color
saturation a little to prevent a washed out look from
increasing the brightness:
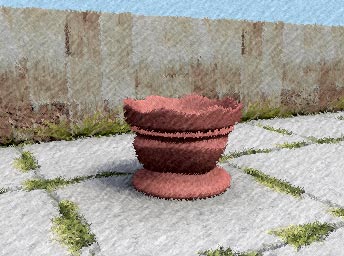
We could even use our post-processing to
really start to change the look of the image, something that
Project Dogwaffle is good at doing! That is beyond the scope
of this tutorial, but here is one quick example made using
the Brush Strokes and Apply Current Paper filters from the
Artistic section:
|
|
Conclusion
One important point to note about the textures on show on
this page - they are all VERY small, just 145 x 145 pixels. This
leads to quite a pixilated look in the grass especially, and
that would be easily solved by using larger sizes for the
images, allowing more texturing and detail. The textures here
were kept artificially small so that they could be displayed
fully on the web page.
Making your own textures need not be difficult, and can be a
lot of fun! Of course, it is also useful when you need to create
a particular effect and you can't find that exact texture
available for free. It also helps to ensure your artwork remains
unique, and that people won't spot "that texture from cover disk
21" in your image or animation.
These techniques can be used with any 2D application, if you
find the equivalent tools, and you can even go further or work
faster in some applications - for example, the latest version of
Project Dogwaffle,
version
2.1b, offers ways to make images seamless (ideal for making
textures), as well as new options in tools like Optipustics, new
filters and plug-ins, performance improvements and more!
Whichever application you use, you can soon build up your own
library of textures, and perhaps most importantly, your own
"library" of texture making techniques that you can use to
swiftly and easily create a texture for any occasion.
This tutorial was originally posted on the Caligari.com's 'Tricks-n-Tips' section.
Return to spacekdet's trueSpace tutorials page |
|