By
Mike Embleton
Introduction
This is a quick tutorial to
share some quick and easy techniques that have proved useful to
me when creating realistic daytime lighting in a scene. Lighting
is often neglected or not given as much consideration as other
aspects of 3D, such as modeling and texturing, yet lighting is
very important!Many people
want to achieve a natural looking daylight look, and yet this
can seem hard to achieve. The good news is that it doesn't have
to be hard at all! The lighting set-up we will use consists only
of two simple elements: a pair of infinite lights, and an array
of local lights.
|
Infinite Lights (Element 1)
First, add an infinite light to
the scene, and then right away add a second, and glue them
together. Now both infinite lights are at the same position
and at the same angle, which is important when casting the
shadows. |
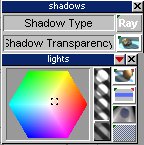 |
Infinite Light 1 Settings
To the left you can see the settings to use for the first
infinite light. The Shadow Type should be set to Raytraced, and
the color of the light made slightly orange. I would suggest an
intensity of about 0.50.
This light will act as our main
light source, in this case, the sun. This light provides a
distinct and quite hard-edged shadow.
|
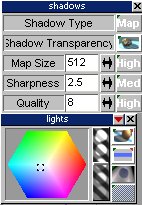 |
Infinite Light 2 Settings
Our second light will add a softer edge around the shadows from
the sun.
This time set the Shadow Type to
Shadow Mapped, and set Map Size and Quality to High, and
Sharpness to Medium. Since these are Shadow Mapped, you will not
get transparency effects from this light.
The color of this light needs to
be slightly blue, and the intensity should be at least double
that of the first light. With both lights now set, we can move
up in the hierarchy to have both lights selected.
|
| Using
the Infinite Lights Since
these lights are glued together, you can rotate them to any
angle you want.
Infinite light 1 is used to add
an orange tint to the scene and give a crisp, but faint outline
to shadows. Light 2 will soften the inside of the shadow where
light still bounces inside the dark areas.
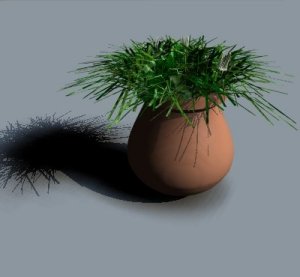
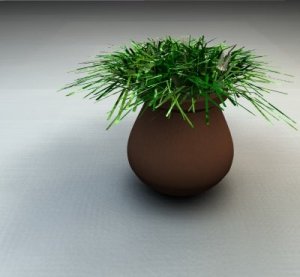
To the right is an example of how
this light element looks when used with this sample plant pot
object.
|
 |
|
Local Light Array (Element 2)
We will now create a
circular array of local lights, which will add an overall
softness to the shadows in your scene.
First select the Top view from
the views menu. Then add a local light to to the scene, and use
Normalize Location to make sure the light is at the center of
your scene. Next, activate Grid Snap. It is not important what
the value for the Grid Snap is (although a value of 1 may be
good to start with) as we are using this to obtain the same
spacing between lights.
|
 |
Now
copy your light at the scene center and move it upward on
screen. Copy the center light once more, and move to the right,
and repeat until you have four local lights arranged in a cross
around the center position of our scene (you can omit the copy
in the last step, and just move the light). Grid Snap ensures
that the lights all end up in spaced equally and accurately.
Next, glue the 4 lights together as
one object, and duplicate this group using the copy button. Use
Move Axes to Center of Object, and then use Normalize Rotation,
which will set the center for our group. Click on the Axes tool
to hide the axes and return to working on the group itself.
|
| Now
right-click the arrow button to bring up the “Object info” menu.
You now need to change the Z-axis rotation value to 45 degrees,
as seen in the picture on the right. This gives us a set of
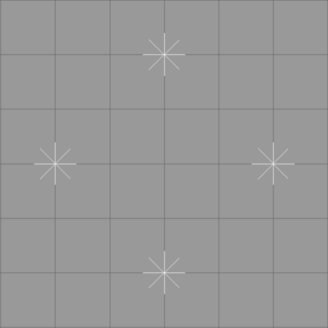
eight lights, equally spaced, as seen below. |
 |
 |
Next,
separate the two groups back into separate lights (you can use
the Split Hierarchy tool). Then glue all 8 lights together as
one group. This will make it much easier to change the settings
for the individual lights when working with this array, by
making it easier to move around in the hierarchy.
You’ll also want to move the axis to
the center of this object again, like we did for the second
array of 4 lights, so you can maintain its position when
scaling.
You could also add more lights in
the array by duplicating this set of eight and rotating again,
but I would only recommend this for really big scenes. I do
think that eight is the minimum you should have.
|
|
Settings for the
Local Light Array
Apart from the color, which can
be different for each light, make sure that all the other
settings for the lights stay the same for each light. If you
change a setting on one light, you should change it on the
others too!
The Shadow Type for your array
should be Shadow Maps, with Quality and Map Size set to High,
and Sharpness set to medium. For each individual light, I would
suggest an intensity of around 0.15, and a setting of Squared
for the Light Falloff setting.
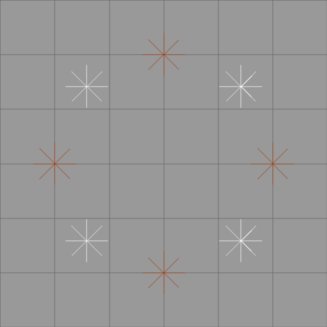
I usually colour each lights
slightly differently. Starting from slightly orange for one
light, and going around the spectrum to slightly blue and back
to orange again as I move around the circle of lights. This
makes each shadow from each light have a slightly different
colour. If they are all set to white, the light from one light
will illuminate the soft edge of the light next to it and all
but cancel it out.
|
| Using
the Local Light Array This
array of lights should be placed pretty high in your scene, and
from experience, I find that about 3 times higher than your
tallest object works out pretty well.
Once you have moved your light
array high enough in the scene, scale the array until the circle
of lights is as wide as your scene.
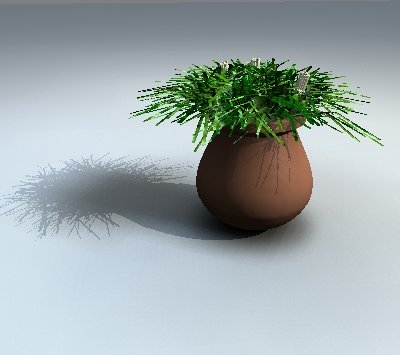
To the right you can see an
example of how this light array looks, using the same sample
object as our test with the infinite lights. For quite a simple
set-up, this is a really nice look to the lighting and shadows!
You can see how the shadows change color too.
|
 |
|
Combining Both
Lighting Elements
Now it is time to combine both
lighting elements that we've created into one scene. You can
position the infinite lights to your desired angle, depending on
which direction the sun is coming from, and you can of course
adjust the colors of both the infinite lights and the light
array depending on the time of day.
Our first test is our
now-familiar potted plant, and even in a straightforward scene
light this, it manages to look pretty good!
When we take exactly the same
light setup into a scene that has a bit more happening, then
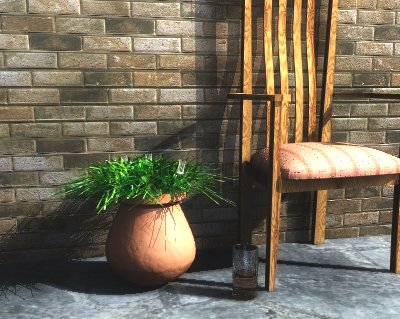
things really come to life! A few extra objects, and we end up
with the image below, which gives you a much better idea of how
effective this type of light set-up can be.
|
|
Additional Points
We have already got a good
result, and there is nothing complex about our light set-up at
all. Things don't have to stop there though!
Depending on your scene, you may
want to add other infinite lights to brighten some shadows so
they are not totally black. In daylight, it is rare to have a
shadow that is genuinely black, and in rendering that can happen
in recessed areas like doorways, for example, and that could
detract from the look of the final image.
I usually have fill lights
pointing from the direction of the camera to the middle of the
scene, and another pointing straight upwards. These lights
should have no shadows and with a very low intensity, something
like 0.1, and they act to simulate how light would bounce into
darkened areas, and the light pointing upward simulates how
light would reflect up from the ground.
Conclusion
When using both these lighting
elements in a scene you should obtain quite a soft feel to the
lighting and shadows. All lights with shadow maps settings will
need to be tweaked to get right. This includes the shadow map
sharpness and size, as well as the falloff and intensity.
It depends on the objects in your scene. If you have objects
like railings or thin posts, you may find that the array of
local lights produces unwanted, fuzzy shadows. In that instance,
I tend to just remove the array, and work with the infinite
lights by themselves.
If you save all the lights
together as one object, you can load it into a new scene so only
tweaking is needed, rather than building a new light set-up each
time.
|
This tutorial was originally posted on the Caligari.com's 'Tricks-n-Tips' section.
Return to spacekdet's trueSpace tutorials page
|
|