| Begin by Creating a NURBS sphere.
You may right click the icon if you wish to adjust primitive options, such as latitude and longitude. |
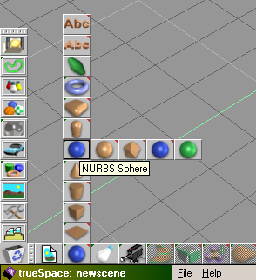 |
| Exit Primitive creation mode by hitting the Space Bar.
Enter edit mode by right clicking on the sphere. Select the middle 'equator' line by clicking once on it, then click 'Scissor patch' icon on toolbar. The sphere is now 2 objects. Delete the bottom half. |
 |
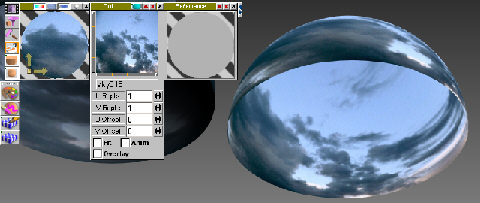
| Open the Material Editor and left, then right click on the Color: shader.
Choose Texture map from the library. Close the library with a quick right-click
drag.
Browse to your desired texture map and choose it. Left and right click on Reflectance: shader, and choose Constant from the library. Other reflectance shaders that work well are Translucent or Translucent Plastic, which can impart a nice 'glow' to the sky. If the sky is not visible except in the reflection of objects in the scene, use of a reflectance shader with Luminance values bumped up can also create a nice effect. Apply the material by clicking the Paint Object icon. |
|
 |
|
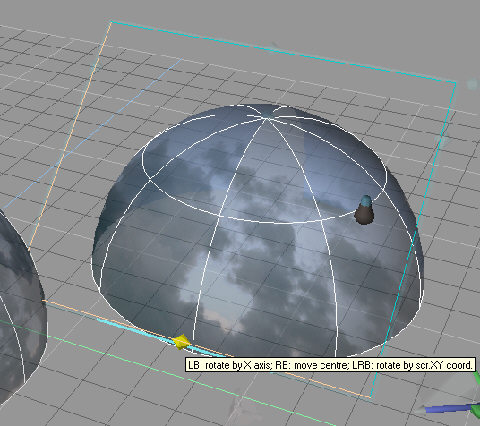
| If the default UV mapping doesn't work with your particular sky texture,
try applying a different map.Planar often works as well as or better than
spherical mapping- experiment! The UV cage can be moved, rotated, or scaled
by using the widgets or the regular Object M/R/T tools. Watch for seams
on your texture- you can either hide it off camera by rotating the dome
or begin by making the texture seamless in a 2D image editor. To exit UV
mode hit the Space Bar.
Once you have it surfaced the way you like, Scale up the dome to encompass the entire scene. Open the Object Info box by right clicking the Object Tool. Click Render Options, then uncheck Cast Shadows and Receive Shadows. This will prevent it from blocking any lights or catching any unwanted shadows. You'll also need an object to serve as a ground or else you'll see the background where the bottom half of the dome is missing. |
|
 |
|
| Permit me to return to the Cabin | On to more tS tutorials |